I get a lot of questions about how to get videos onto your iPhone or iPod or iPad or iMac or what i-have-you. There’s actually a really easy way to do this, and it has an added bonus of letting you get your current DVD library stored on your Mac. Outside of potentially saving space in your house, it has the benefit of having all your movies instantly available, and if you connect to a large display or a TV, well, that’s pretty darn convenient. Movies, much like music, are one of those things where a strong argument can be made for letting your computing devices take over. Saves you space, and makes it a great deal easier to find what you want.
A couple of notes:
1) While this might save you space in your house if you then chuck your DVD, it will take up plenty of space on your Mac or other i-device. If you start getting really movie-happy it’s entirely possible you’ll need a bigger hard drive lickity split, so keep an eye out on the remaining space on your drive.
2) This won’t do things like transfer special features, scene selection, other languages, etc. It will just create a video file you can play on your electronic device from start to end, much as you would stream a youtube video (although you can, of course, jump to any point in the video you like at any time). If you want to preserve special features and other DVD perks, you will need to go through a slightly more complex process, so we’ll leave that be for now.
3) Converting and importing video is processor intensive. It will make your computer work hard, and so other operations might be quite a bit slower while your Mac concentrates on this.
The most straightforward way to do all of this (and deliciously free) is to use an application called Handbrake.
So, step one: Download Handbrake. It will ask you on that page if you want to download a 32bit or 64 bit version of Handbrake. You can use the instructions on this page if you want to figure which one to download, but a pretty good rule of thumb is that if your computer was made in the last five years you’ll want to download the 64 bit version.
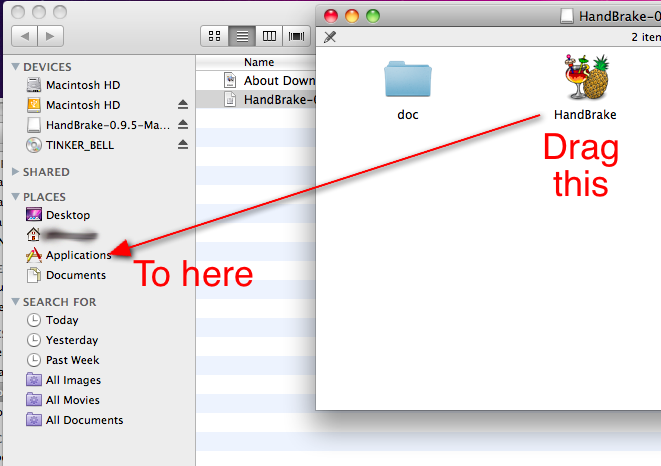
Once downloaded, you will get something like this (note, if the Mac instead gives you something like this, double click on the handbrake file. Then it should give you the image below).
From the window that opens up, drag Handbrake to your applications folder. You’re almost ready to use it!
The trick is that before you can use Handbrake, you need to download and install an application called VLC. VLC is a swiss-army-knife like tool for playing or importing different video formats, and it’s valuable to have on your computer either way. You can download it here. Once it downloads, install it using the same process you used to install Handbrake. (copy to your Applications folder, etc)
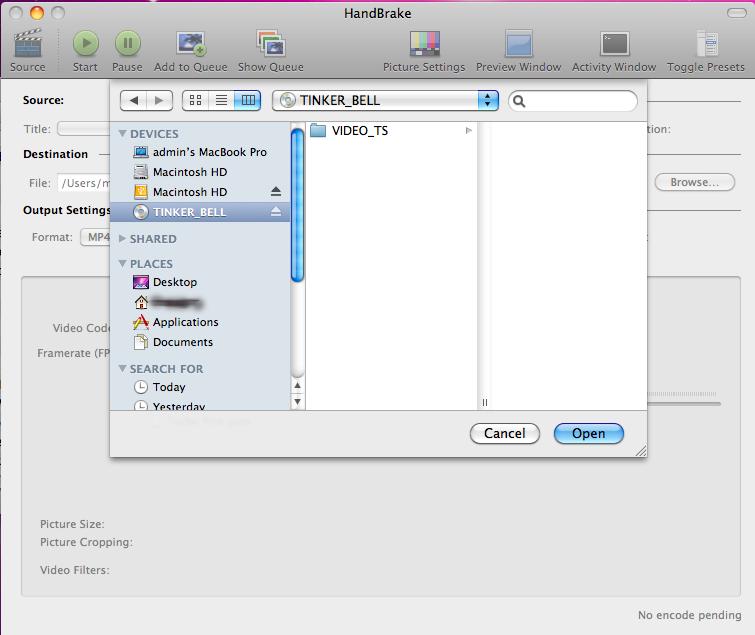
Insert your DVD. DVD Player will (probably) try to automatically launch; when it does, quit it. Now, launch Handbrake, and it will ask you what you want to use as a source. Simply click on your DVD in theft hand column, and click ‘Open’.
At this point, Handbrake is going to scan the entire disk, something that will take a few minutes. Be patient. Catch up with some friends, get some work done, or stare at the screen obsessively. Handbrake is going to finish and present you with the main Handbrake screen. There are a number of ‘titles’ on your DVD that represent the movie, special features, etc. By default, Handbrake will try to pick the one it thinks is correct; but in general you pick the longest one for a movie, and you will have a number of similarly timed options if it’s a TV show with episodes.
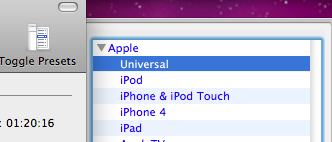
 Next, you are going to the sidepane and clicking the little triangle next to where it says ‘Apple’ and choosing ‘Universal’. For most folks with a Mac, this will do the trick and provide something that will work on your computer, iPad, or iPhone.
And finally, the next to last step: Click on the ‘Subtitles’ tab and choose ‘English’ as the language you want subtitles for.
Then, click on ‘Forced Only’ to only include the subtitles that would normally appear in a movie theater when someone is speaking foreign dialogue.
Finally, click on the big green ‘Start’ button in the top toolbar of the window. You’re off! This could take a while.
When Handbrake is done, you should end up with a file on your desktop with the same name as the DVD in your drive. You can then place this movie file anywhere you want – Personally, I’d recommend dragging them to iTunes. That way, not only can you keep a nicely organized collection of all your movies in one place, it’ll also be snap if you ever need to place them on your i-Device of choice. One thing to keep in mind, if you do that, is that iTunes creates a copy of the movie file when it adds it to the iTunes library; this means that once it is done adding it, you can trash the file from your desktop.


