
Hi there! You’re probably reading this because you’ve been directed to this post by your friendly Out of a Jam support tech.
Maybe you’ve opened TeamViewer, shared your ID or session code, and granted access to your Out of a Jam tech– But they can’t see your screen!
Or maybe you’ve run into a wall on your own, and can’t figure out why clicking the little checkbox next to the TeamViewer permissions prompts is not enabling the setting it should be enabling.
Or maybe you’ve tried to use TeamViewer with someone else, and the person making the connection also can’t see your screen!
These issues are all addressed by providing specific system access settings for TeamViewer on macOS.
But how the heck do we do that??? It’s confusing!
Don’t worry! We’re here to help.
What we will be doing is adjusting at least 2 and sometimes up to 4 settings in your macOS System Settings, that will allow TeamViewer to interact with your computer in the way it needs.
The two most important settings to confirm are “Screen Recording” and “Accessibility.”
Step 1: Confirm you see the “Set up your Mac for TeamViewer” pop-up.
When you open TeamViewer, whether TeamViewer “original recipe,” TeamViewer QuickSupport, or TeamViewer Host, you may be prompted to approve system access. You’ll see a module or little pop-up that looks like this:
![Screenshot of TeamViewer for macOS showing a pop up that says "Set up your Mac for TeamViewer" with the subheading "TeamViewer needs to use the Screen Recording and Accessibility features of your Mac." Under this are three options: "Allow your screen to be seen during a connection / [in blue:] Set up Screen Recording," "Skip your Mac's periodic Screen Recording reminders. Required for unattended access / [in blue:] Set up Remote Desktop," and "Allow your mouse and keyboard to be controlled during a connection / [in blue:] Set up Accessibility." To the right of each of the three items is a circular empty checkmark icon. At the bottom of the popup are buttons to "Learn more" and "Close."](https://www.outofajam.net/blog/wp-content/uploads/2026/07/Screenshot-2026-07-30-at-1.48.35-PM.png)
If you don’t see the pop-up, that’s okay! First, make sure TeamViewer is open. You should see TeamViewer to the left of the Apple icon in the top left corner of your screen.

From here, you can often get to the system access check pop-up by clicking the “Help” menu (just a few items over from “TeamViewer” in the top left menu bar!) and choosing “Check system access” from the drop-down. If you need to adjust settings here, you’ll often see a yellow “Alert” symbol!
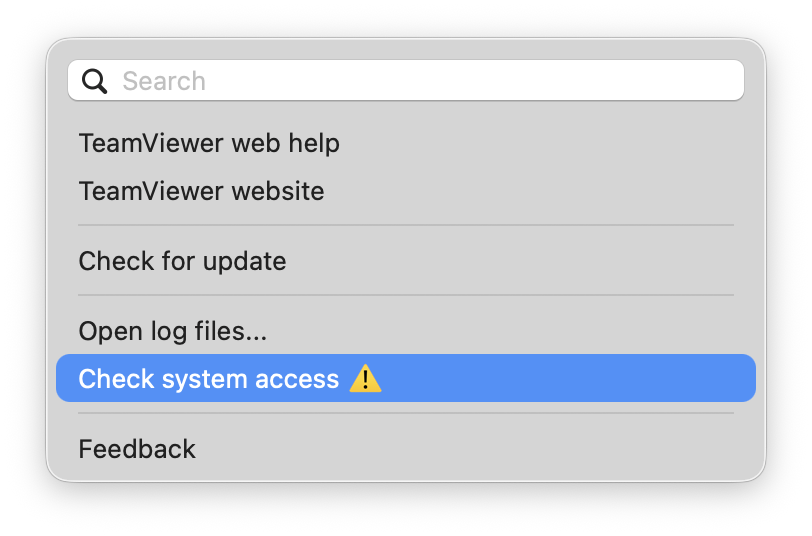
After clicking “Check system access,” you should see the pop-up!
* Sometimes “Check system access” is found by clicking a TeamViewer Host icon in the top right corner of your screen, near the wifi symbol (primarily for business clients). Sometimes it is found by clicking a small “gear” icon in the top right or left corner of your TeamViewer app itself. TeamViewer has various versions and the way to get to Check system access is also varied. Don’t lose hope!
If you are using an older version of TeamViewer or macOS, your pop-up might be less colorful. Here’s an example of an older version of the same prompts:
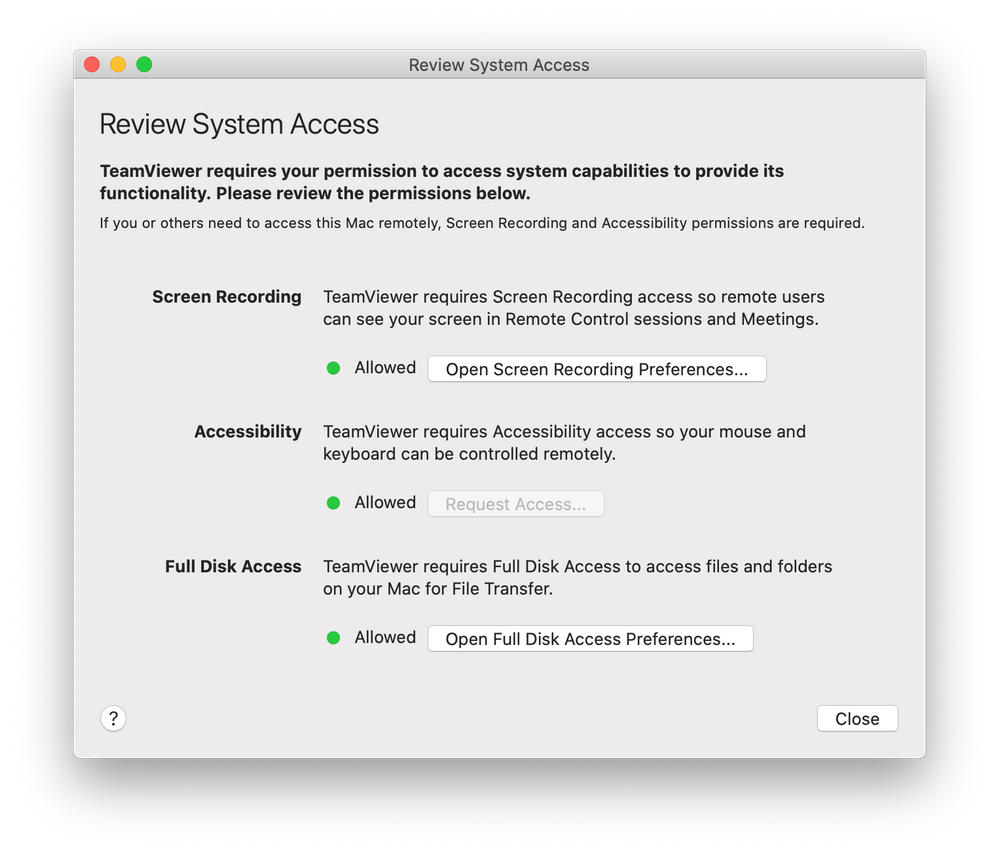
In this example the settings have already been configured. If they are not “Allowed” you will see either a prompt to “Request access” or a red X that shows “Access Denied.” You can click “Request access” or “Open ___ Preferences” next to any of the items to edit or update each setting, much like Step 2 below.
Part of how macOS maintains security is by not letting things like mouse control, camera control, or screen access be enabled except by specific, intentional allowance for each app that wants it. If you have an iPhone, you may be used to this, in the form of the phone checking with you any time an app wants to access your photos, or use your microphone. Instead of just clicking “allow” on a pop-up, though, macOS requires that you yourself go to System Settings and toggle these features on for each app. It is a little clunky, but it also keeps macOS secure and protects your privacy!
Step 2: Follow the prompts to approve access
It seems like you should be able to click the little circle checkbox icon to the right of the options for Screen Recording and Accessibility. But unfortunately, this is just a poorly designed interface. If you click the little checkbox, nothing will happen, except that you might get frustrated!
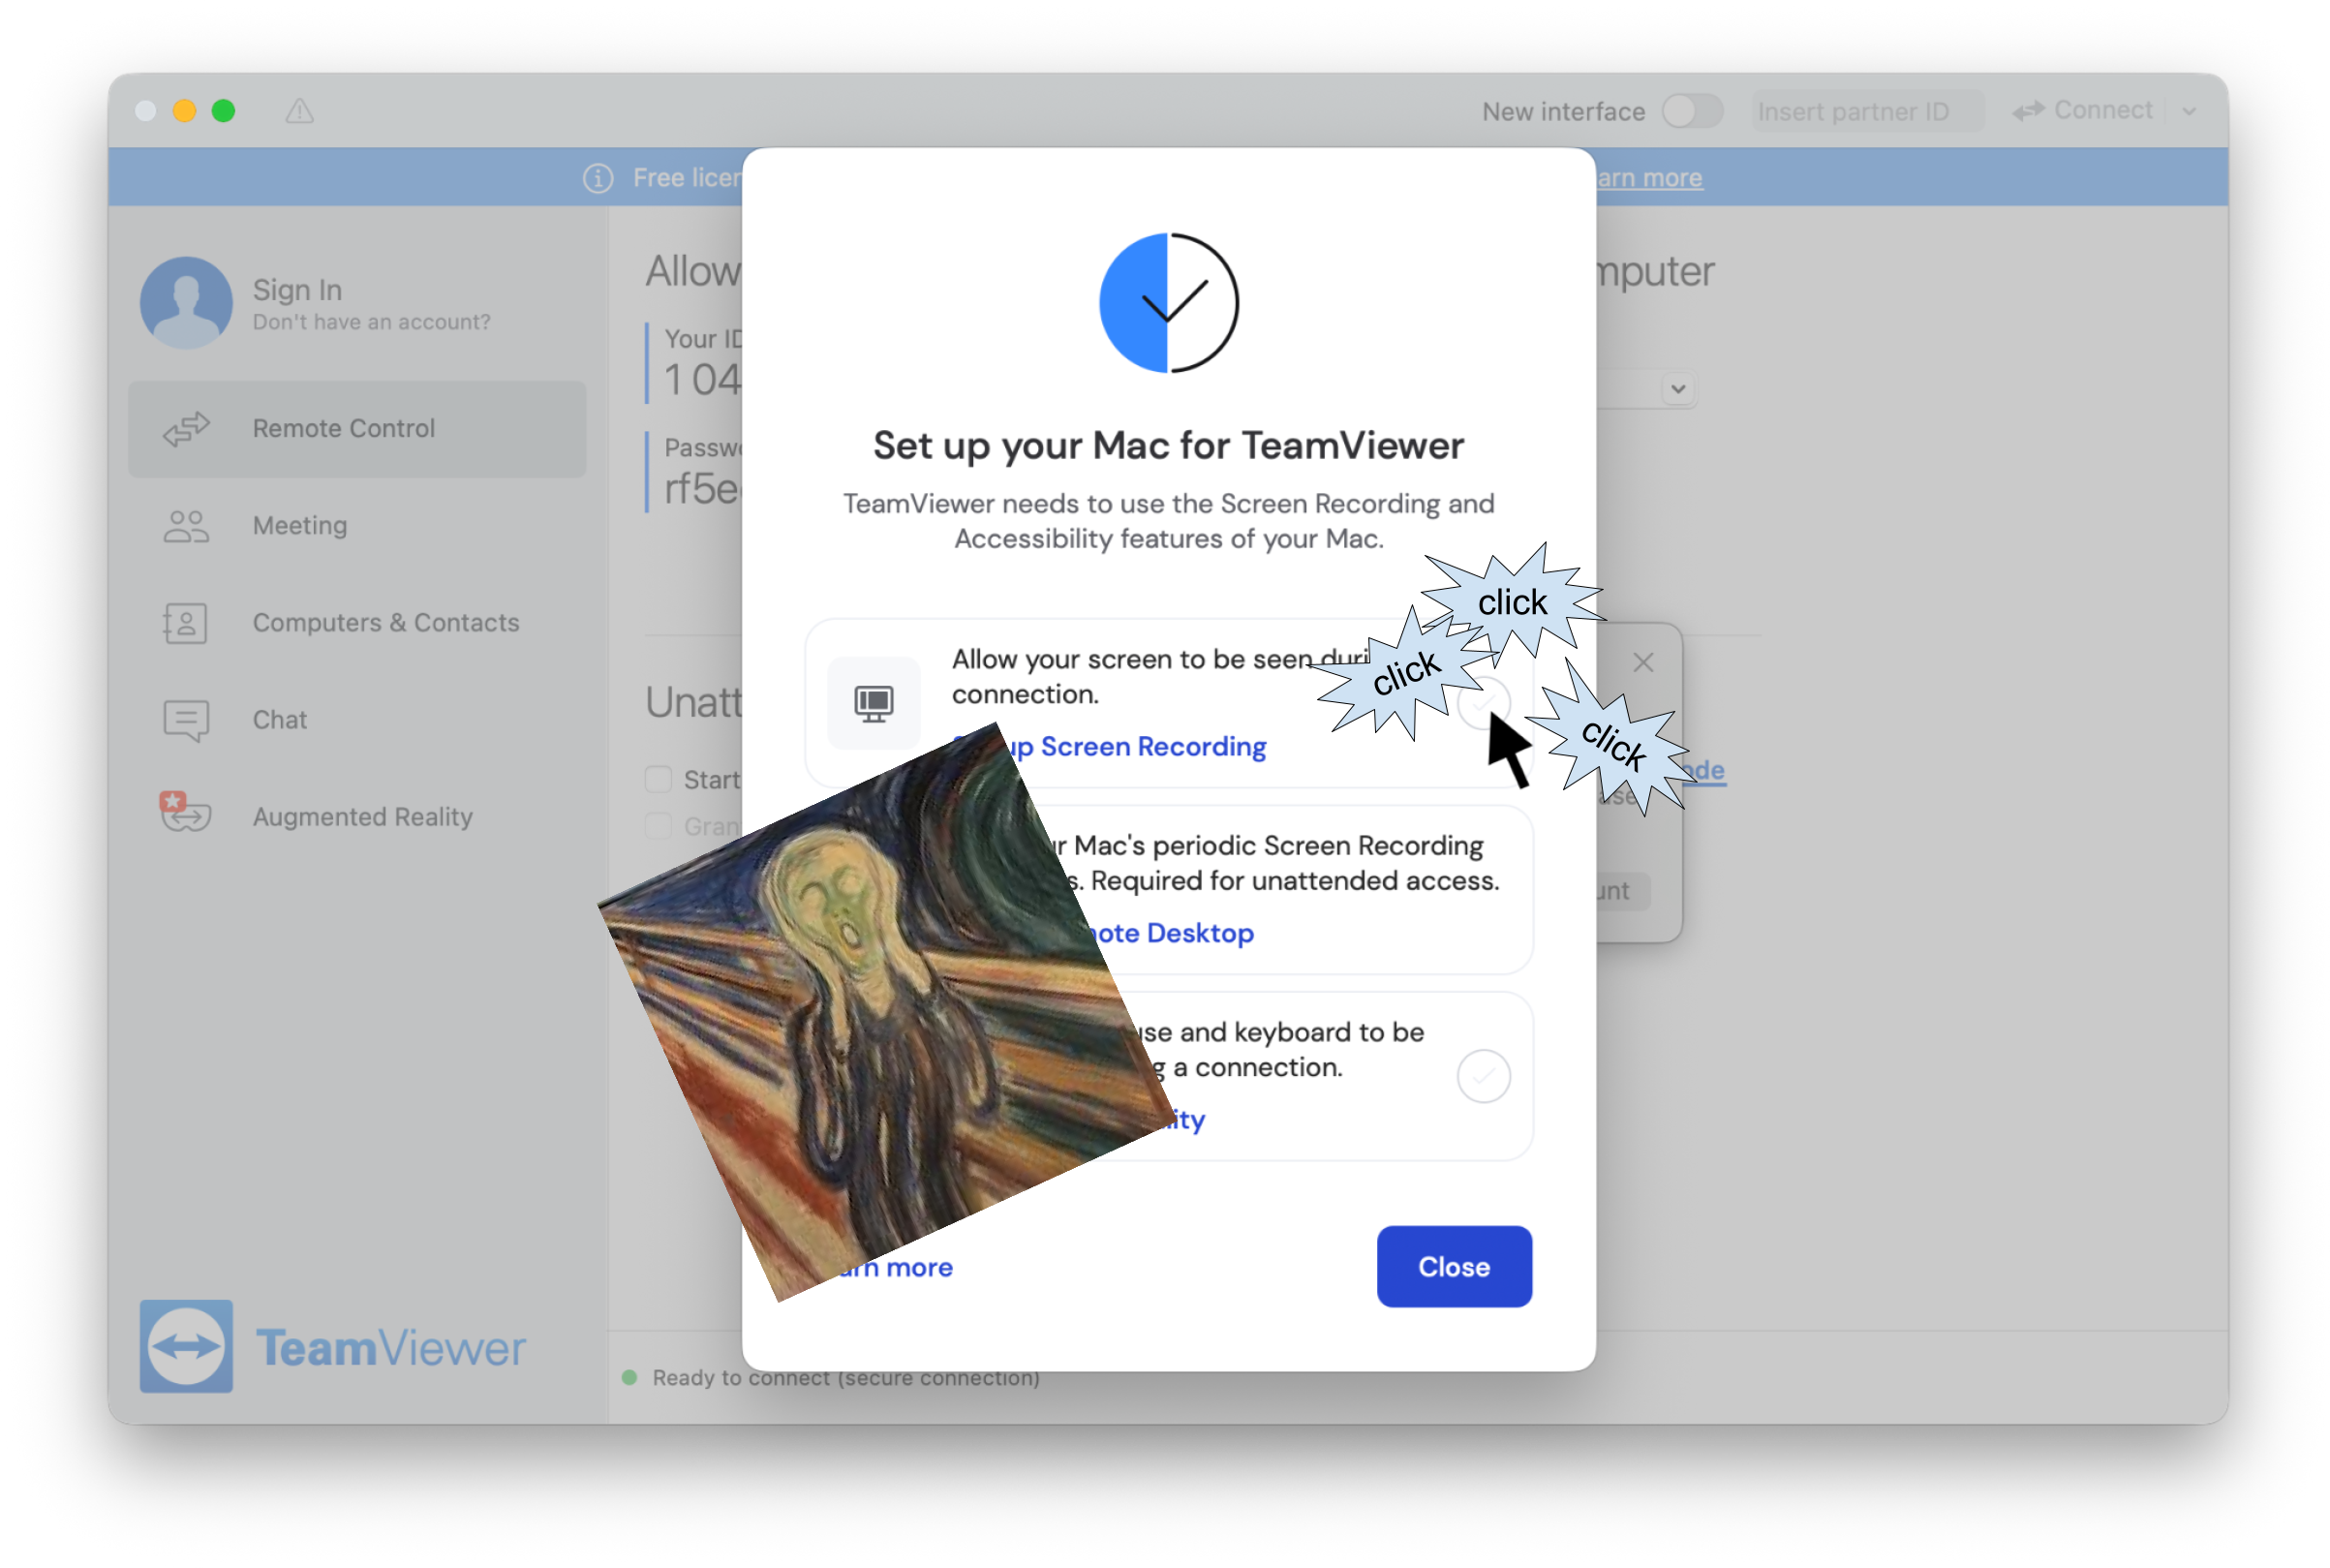
No, instead, we must zero in on something else, a clue if you will, in this sub-par pop-up. We must click… THE BLUE WORDS!
Try it yourself by clicking “Set up Screen Recording.”
![Screenshot of TeamViewer for macOS showing a pop up that says "Set up your Mac for TeamViewer" with the subheading "TeamViewer needs to use the Screen Recording and Accessibility features of your Mac." Under this are three options: "Allow your screen to be seen during a connection / [in blue:] Set up Screen Recording," "Skip your Mac's periodic Screen Recording reminders. Required for unattended access / [in blue:] Set up Remote Desktop," and "Allow your mouse and keyboard to be controlled during a connection / [in blue:] Set up Accessibility." To the right of each of the three items is a circular empty checkmark icon. At the bottom of the popup are buttons to "Learn more" and "Close." A red arrow points to the words "Set up Screen Recording."](https://www.outofajam.net/blog/wp-content/uploads/2026/07/Screenshot-2026-07-30-at-1.48.35-PM-copy-2.png)
This will open either System Settings, or a prompt offering to open System Settings.
If you get a prompt to open System Settings, go ahead and click “Open System Settings,” “Open System Preferences,” or “Request access.”
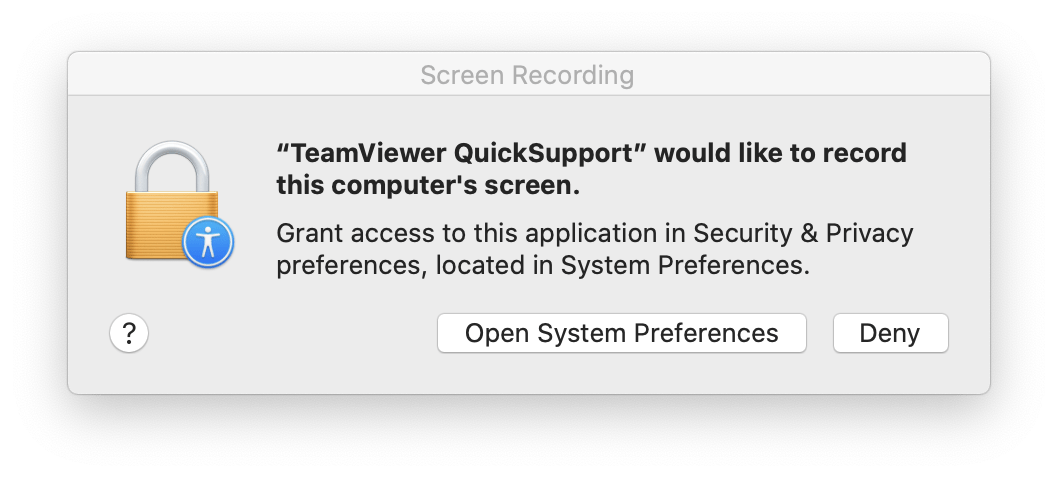
Sometimes, clicking “Open System Settings,” “Open System Preferences,” or “Request Access” doesn’t get us where we need to be. If you don’t see System Preferences or System Settings at this point, check out how to manually grant permission at the end of this guide!
macOS updated its overall settings panel from the name “Preferences” to “Settings” for macOS Venture (13.x) in 2022. If you are on an older version of macOS, you will see System Preferences instead of System Settings. You will also see that in each app, the app’s dedicated settings are called “<App name> Preferences” on older versions, but are currently called “<App name> Settings.” For this guide, note that on a basic level, “Settings” and “Preferences” can be interchanged!
Step 3: Screen & System Audio Recording Settings
When you click “Set up Screen Recording” or any of the other variations, you should see System Settings open with “Screen & System Audio Recording” or something similar at the top. If you don’t see this, jump down to How to Manually Set up Permissions at the end of this guide!
(When you click the BLUE WORDS for “Set up Accessibility” or “Set up Remote Desktop”, the heading that opens in System Settings should match! It’s okay if it doesn’t– jump down to Manual Setup if needed!)
Under the “Screen & Audio System Recording” header, you should see a small box that lists apps that have requested this permission. Apps that commonly request this are Zoom, Teams, password managers, and many others.
You should also see “TeamViewer” in this list. You might notice that some of the apps in the list have a checkmark next to them, or a toggle switched “on” to the right. TeamViewer will not have its toggle switched “on.” You can simply click the toggle to grant permission.
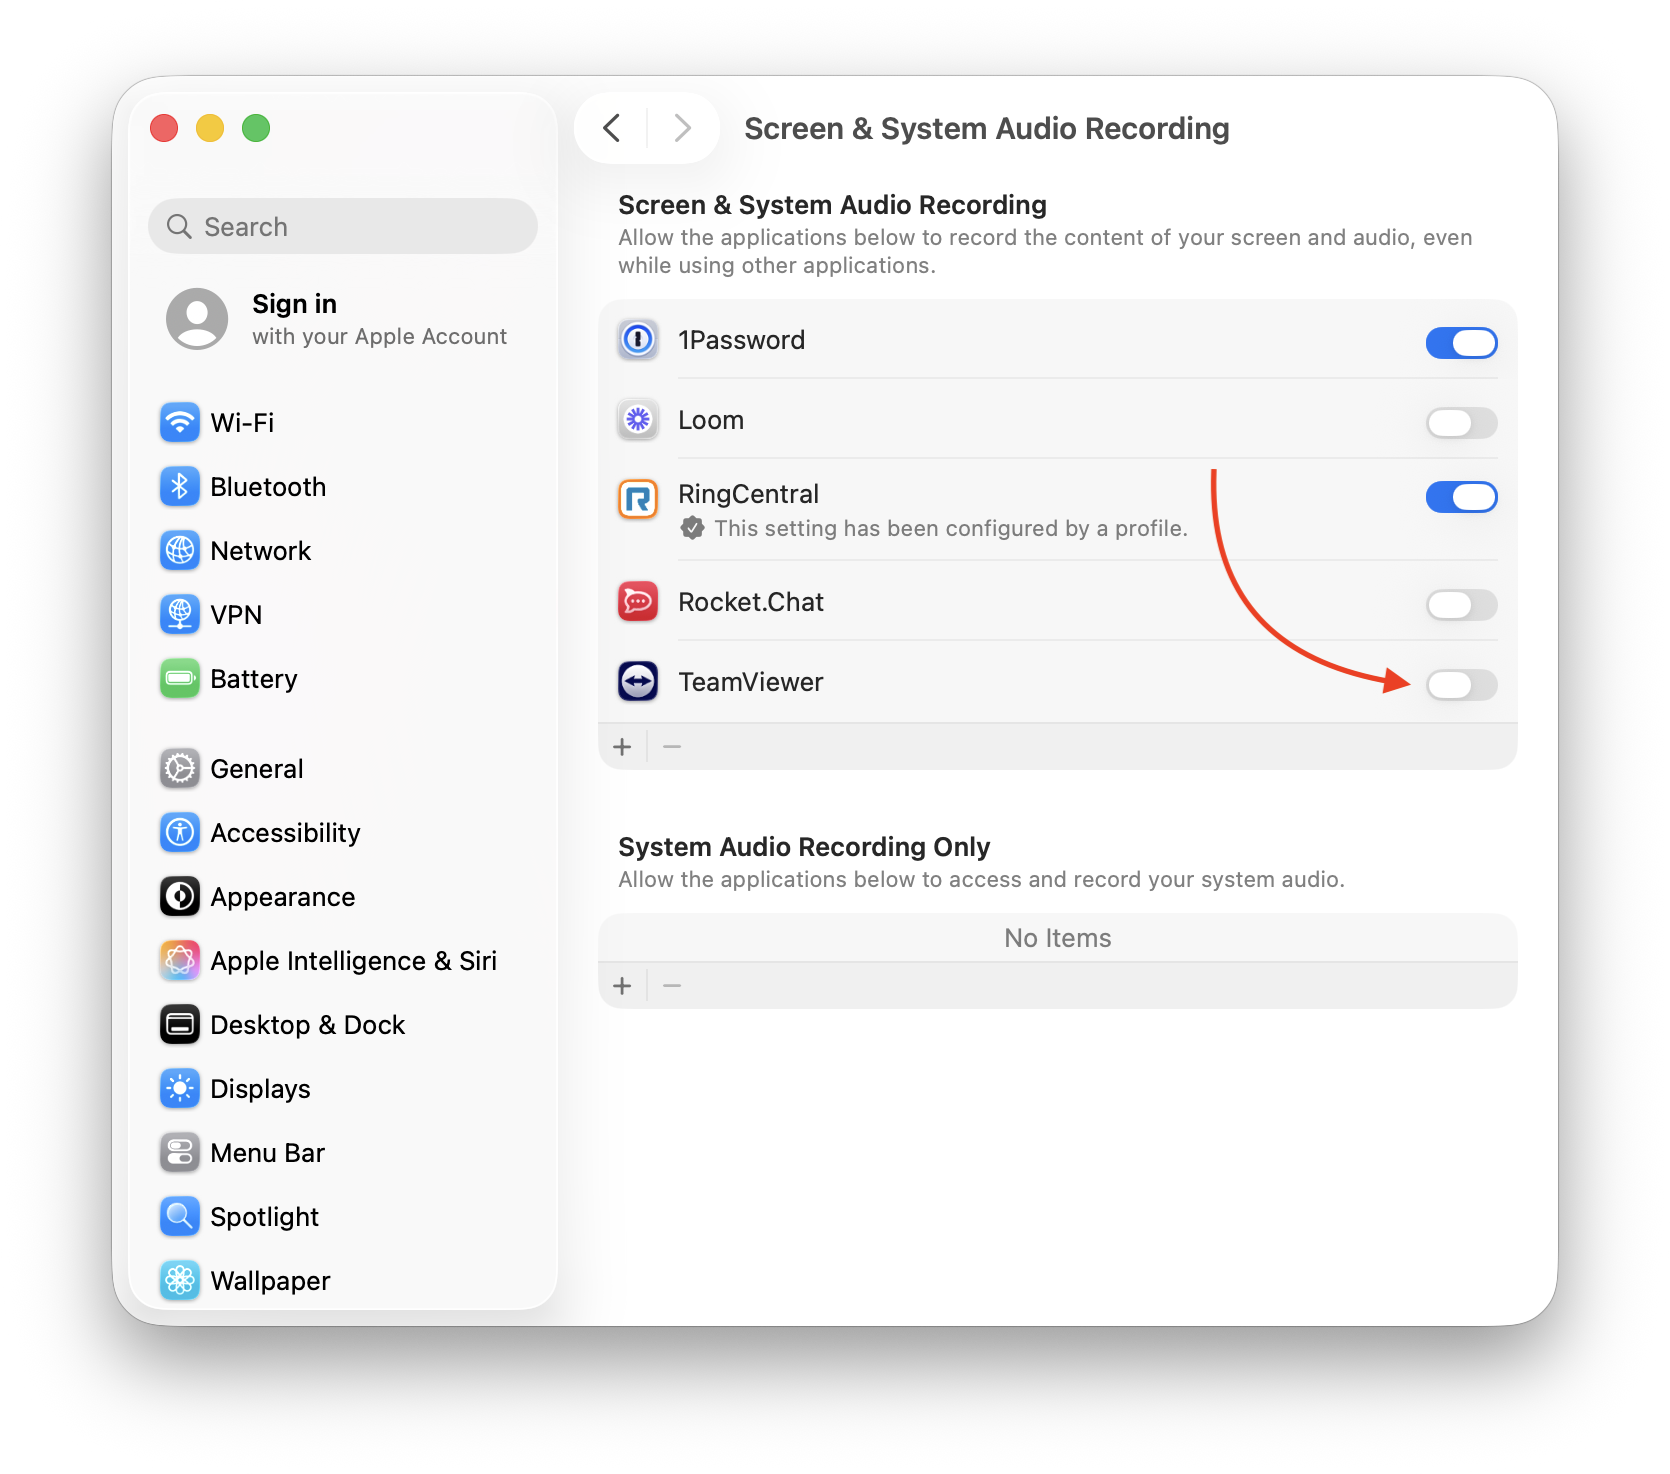
You may be prompted for your fingerprint or your computer password. Enter the credentials and click “Okay” or hit return.
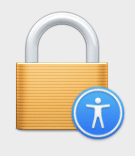
Look for a yellow lock icon in the bottom corner of System Settings. Click the lock. This should ask you for a username and password. Try your own computer login information. If this doesn’t work, you may need an administrator password to approve this setting!
If your computer belongs to an organization that you work with, or if you have another user set up as an admin for security purposes, you may not have permissions to make changes in System Settings. If you are asked for an administrator username and password, this is the time to contact your IT team!
If you are a Service Contract Client with Out of a Jam, you may have access to Self Service. If you know how to do so, you can enable Admin On-demand. If not, reach out to Out of a Jam for instruction or other assistance!
“Screen recording” does not mean, in this case, recording a copy of your screen to keep. It is the way a remote tech is able to view your screen in real time.
A remote desktop app / remote support app like TeamViewer does not actually open a window or portal through which to view your computer. Your computer has to send the image of your computer screen to the tech. Imagine your computer is sending a picture of your screen across the invisible wires of ye olde interenete like you would send a screenshot or picture. Of course, to see what is currently happening on your computer, every time there is a change (such as your mouse moving), your computer would need to send a new picture. That’s when we get into “video” type territory– Many pictures captured over and over in quick succession. Technically, this is recording your screen– It’s just happening so fast that it feels like real time.
Regardless of the technicality, you don’t want your computer to do this without your say-so! That’s why these somewhat cumbersome settings are in place: so that it’s very intentional that you are providing permission for someone to view your screen.
Unless they notify you otherwise, your tech is not keeping a copy of your session (at least not if you are working with Out of a Jam!).
Also, note that unless you give out specific credentials, no one, not even your very own dedicated Out of a Jam Tech, can just jump onto / view your computer without your explicit permission, even after you’ve enabled this setting!
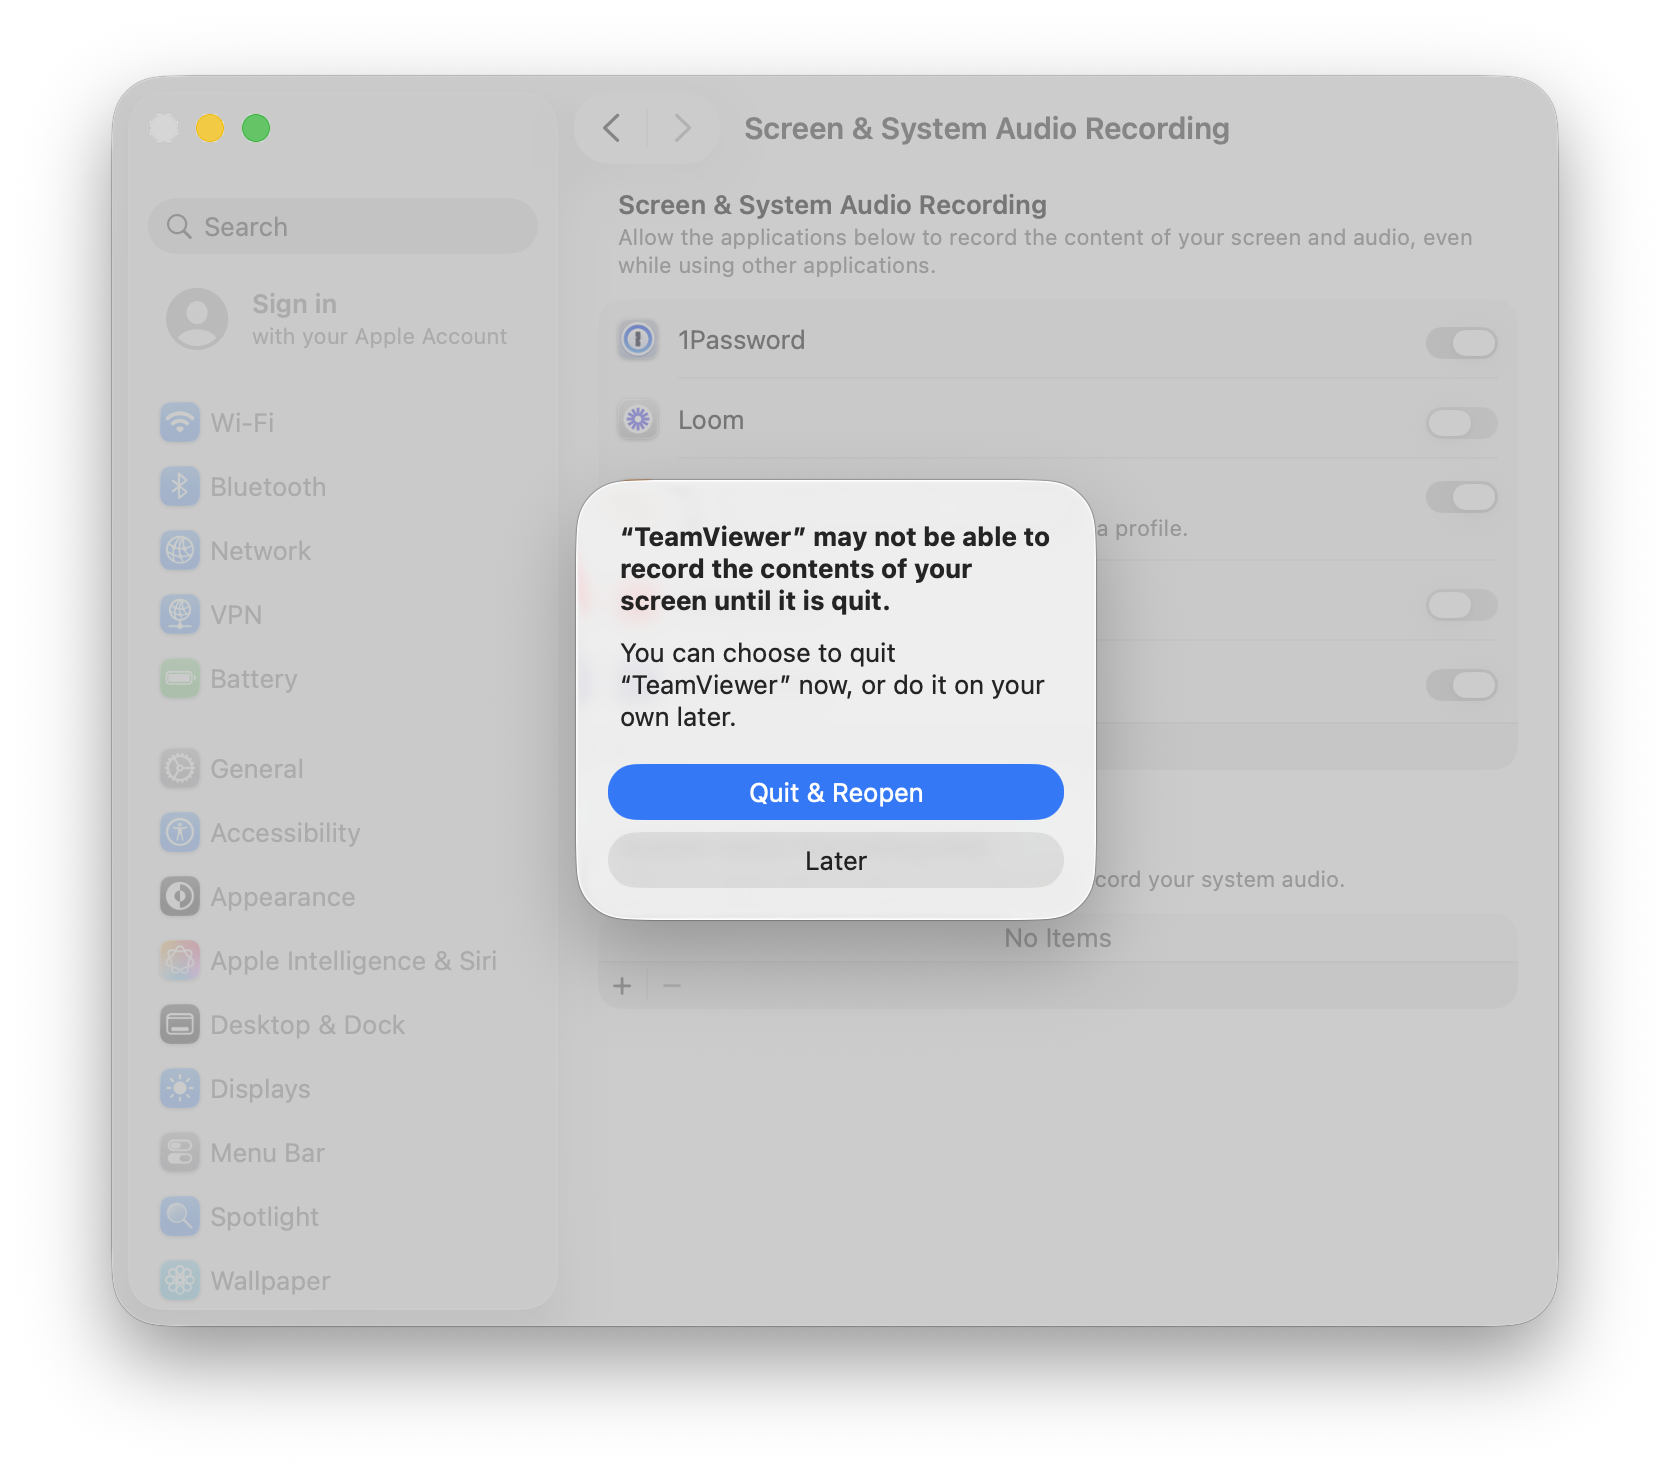
A new pop-up will appear telling you that you need to “Quit & Reopen” TeamViewer for this setting to work.
Guess what?
This is a lie!
Or at least, it mostly is. I’ve only seen one case ever where the user really did have to quit and reopen to get Screen Recording (aka screen-sharing!) to work. Most of the time, if you choose “Later,” you’ll be just fine.
Why does this matter? It doesn’t really. If you choose Quit & Reopen, you should still get where you need to go. However, if you are currently on a call or session with an Out of a Jam Tech who has connected to your computer but couldn’t see your screen until just now, choosing Quit & Reopen will boot them off! If you are actively on the phone and working with a remote tech, it’s better to choose “Later” unless they tell you otherwise. For now, let’s click “Later.”
Now you have a bunch of confusing windows open. What should you do next?
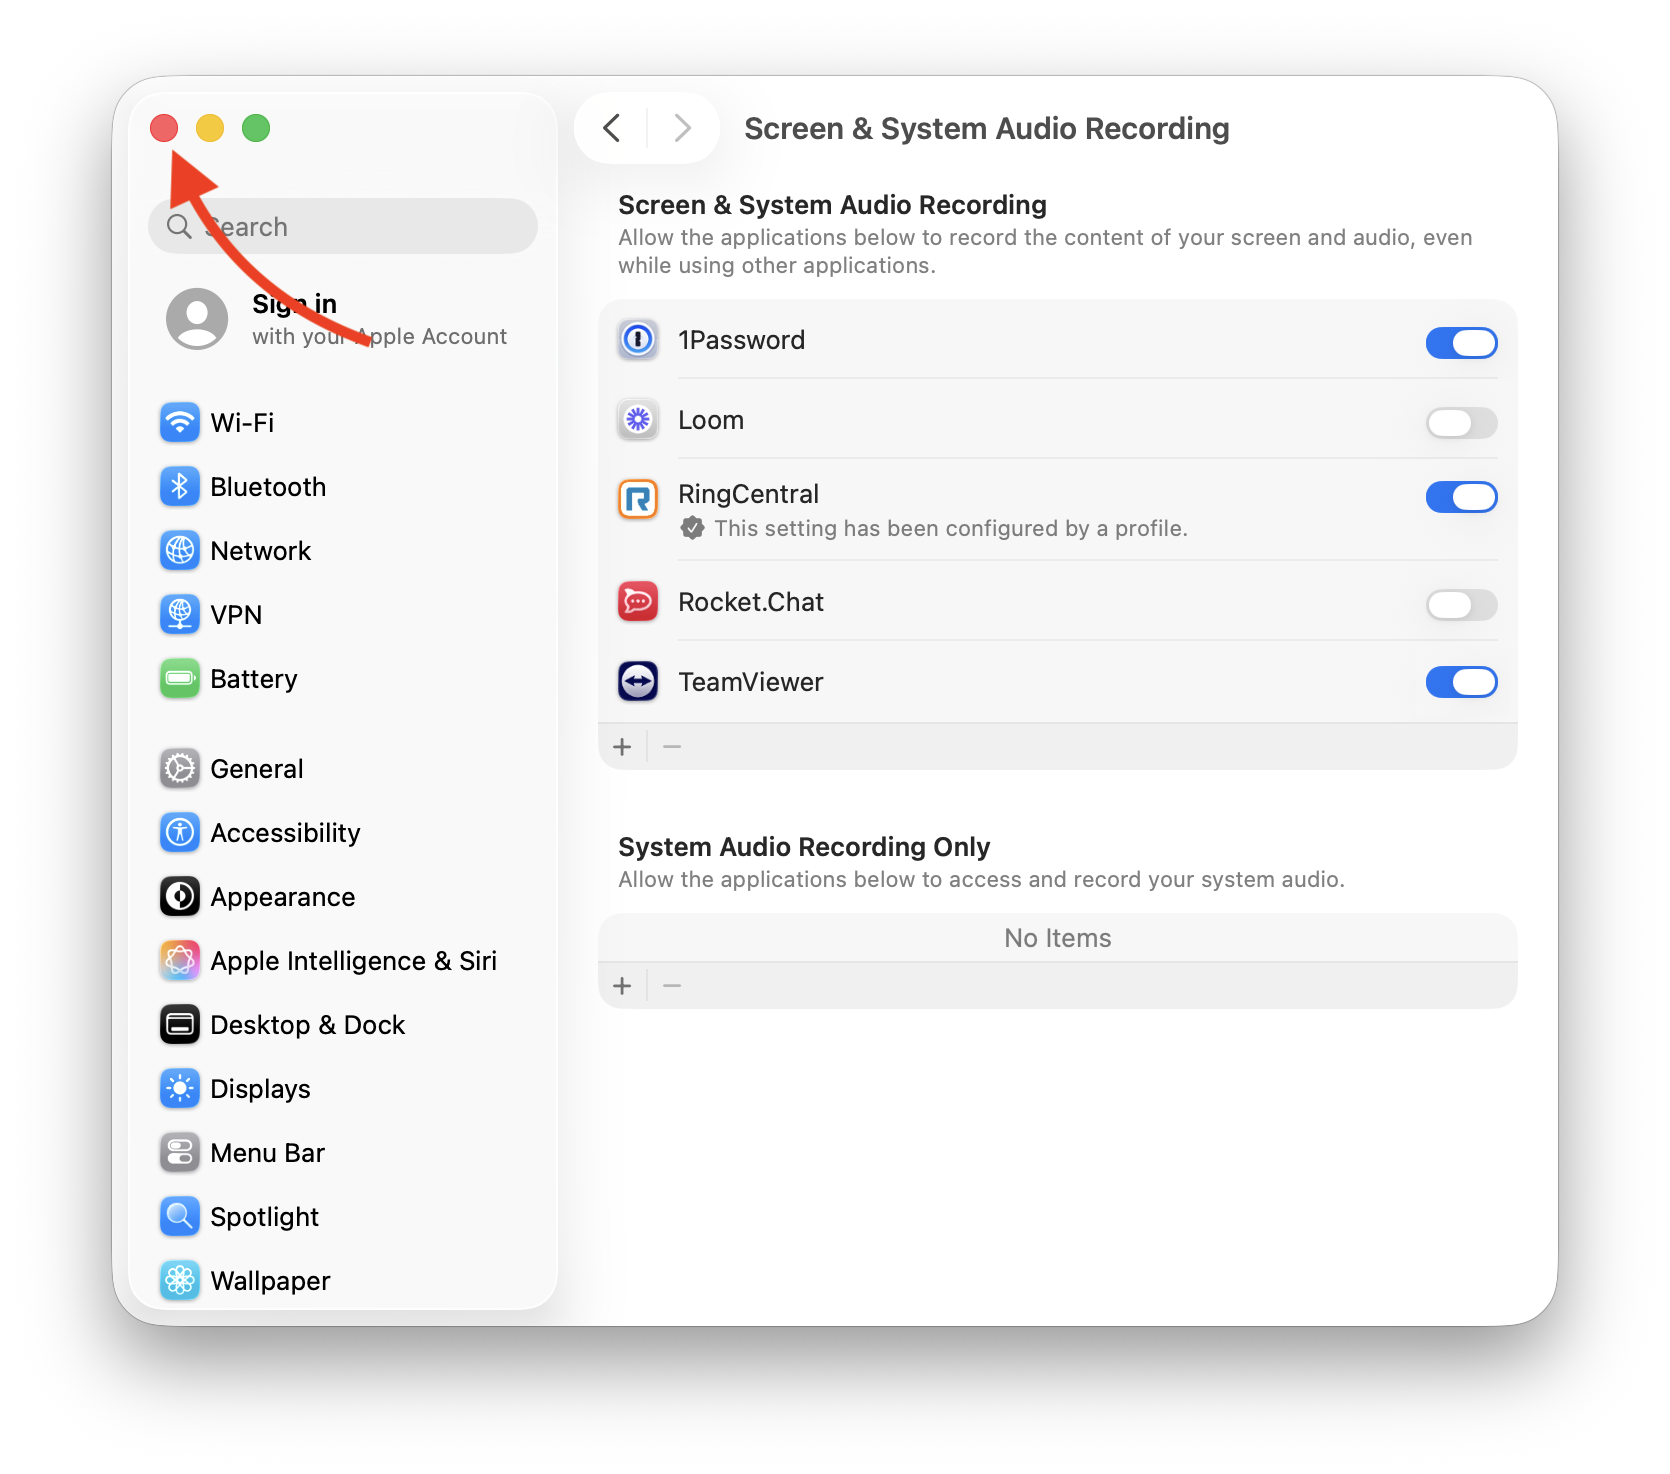
Start by closing out of System Settings. Yes, we’ll be right back, but this is actually an important step (TeamViewer has to send a prompt to System Settings for each of these requests, which works better when System Settings is not open). You can close out of System Settings by clicking the red dot in the top left corner of the window.
Step 4: Back to TeamViewer Permissions request
Closing System Settings should bring you back to the TeamViewer permissions pop-up. If it doesn’t, click the TeamViewer icon in your Dock. You should now see a blue checkmark next to “Screen Recording”, or a green dot with “Allowed” next to it in the older versions of TeamViewer and macOS. Nice work!
![Screenshot of TeamViewer for macOS showing a pop up that says "Set up your Mac for TeamViewer" with the subheading "TeamViewer needs to use the Screen Recording and Accessibility features of your Mac." Under this are three options: "Allow your screen to be seen during a connection / [in blue:] Set up Screen Recording," "Skip your Mac's periodic Screen Recording reminders. Required for unattended access / [in blue:] Set up Remote Desktop," and "Allow your mouse and keyboard to be controlled during a connection / [in blue:] Set up Accessibility." To the right of "Set up Screen Recording" is a blue checkmark. To the right of Set up Accessibility is a circular empty checkmark icon. At the bottom of the popup are buttons to "Learn more" and "Close."](https://www.outofajam.net/blog/wp-content/uploads/2026/07/one-checked.png)
What’s the next step? You guessed it– It’s time to click the BLUE WORDS again. Remembering that the two most important settings to provide a tech access are Screen Recording and Accessibility, we’re going to skip past “Remote Desktop” for now, and click “Set up Accessibility.”
![Screenshot of TeamViewer for macOS showing a pop up that says "Set up your Mac for TeamViewer" with the subheading "TeamViewer needs to use the Screen Recording and Accessibility features of your Mac." Under this are three options: "Allow your screen to be seen during a connection / [in blue:] Set up Screen Recording," "Skip your Mac's periodic Screen Recording reminders. Required for unattended access / [in blue:] Set up Remote Desktop," and "Allow your mouse and keyboard to be controlled during a connection / [in blue:] Set up Accessibility." To the right of "Set up Screen Recording" is a blue checkmark. To the right of Set up Accessibility is a circular empty checkmark icon. At the bottom of the popup are buttons to "Learn more" and "Close." A red arrow points to "Set up Accessibility"](https://www.outofajam.net/blog/wp-content/uploads/2026/07/one-checked-1.png)
Step 5: Accessibility Settings
Just like with Screen Recording, clicking this should bring you to System Settings or System Preferences. If other boxes pop up asking for a confirmation, choose “Request access” or “Open System Settings” as needed.
Now at the top of System Settings, we should see “Accessibility.” If not, check out how to manually provide permissions at the bottom of this guide.
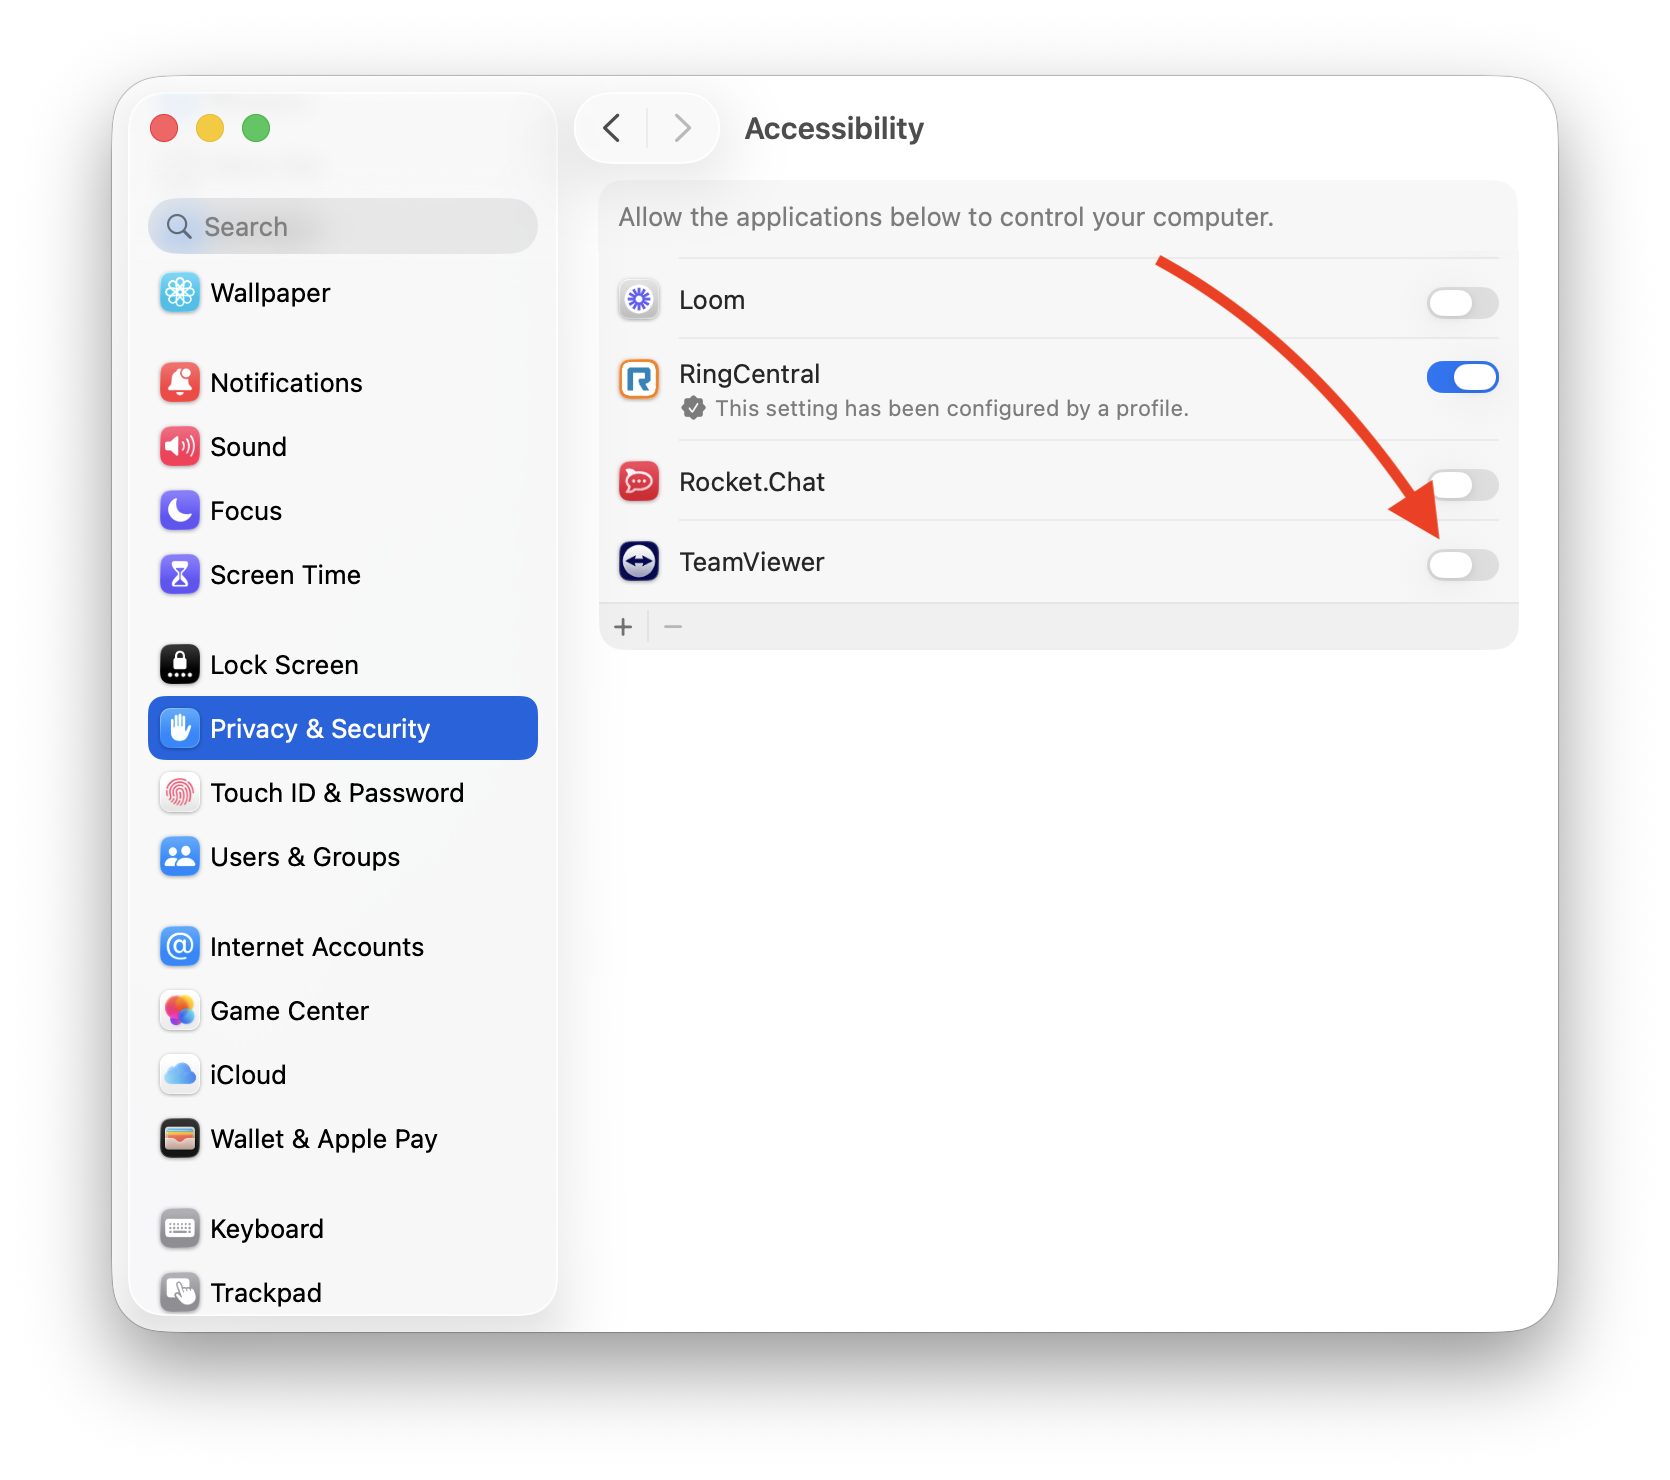
Also like with Screen Recording, we need to toggle “on” the button to the right of TeamViewer.
Just like with Screen Recording, you may be prompted to enter a username and password.
Look for a yellow lock icon in the bottom corner of System Settings. Click the lock. This should ask you for a username and password. Try your own computer login information. If this doesn’t work, you may need an administrator password to approve this setting!
If your computer belongs to an organization that you work with, or if you have another user set up as an admin for security purposes, you may not have permissions to make changes in System Settings. If you are asked for an administrator username and password, this is the time to contact your IT team!
If you are a Service Contract client with Out of a Jam, you should have access to Self Service. If you know how to do so, you can enable Admin On-demand. If not, reach out to Out of a Jam for instruction or other assistance!
This time, when the toggle is toggled, it shouldn’t ask you to Quit & Reopen, but if it does, you can choose “Later.” As before, close System Settings with the red dot in the top left corner.
Step 6: Repeat!
Screen Recording and Accessibility are the settings that NEED to be allowed in order for your Out of a Jam Tech to conduct a remote session. You can also enable “Full Disk Access” (on older versions) and “Remote Desktop” if you want by repeating these steps for each prompt. If either of these is needed, your tech will usually inform you. It’s perfectly fine (and even advisable, from a security standpoint) to leave those without access granted for now.
At this point, if you are working with a tech, they should have access and be able to start the real troubleshooting! Go team go!
![Screenshot of TeamViewer for macOS showing a pop up that says "Set up your Mac for TeamViewer" with the subheading "TeamViewer needs to use the Screen Recording and Accessibility features of your Mac." Under this are three options: "Allow your screen to be seen during a connection / [in blue:] Set up Screen Recording," "Skip your Mac's periodic Screen Recording reminders. Required for unattended access / [in blue:] Set up Remote Desktop," and "Allow your mouse and keyboard to be controlled during a connection / [in blue:] Set up Accessibility." To the right of Set up Screen Recording and Set up Accessibility are blue check marks. At the bottom of the popup are buttons to "Learn more" and "Close."](https://www.outofajam.net/blog/wp-content/uploads/2026/07/Screenshot-2026-07-30-at-1.50.20-PM.png)
Epilogue: But what if none of that worked!
macOS requires permission requests of these types to be done within System Settings by a user. In other words, it will not allow any application to have a simple button that “just does it.” That’s a good thing! We don’t want to accidentally enable Screen Recording or control over the mouse by accidentally clicking something.
However, that does sometimes mean things don’t work perfectly. The most macOS will allow an application to do with a button click is open System Settings. The click is meant to take you to “the right place,” but that depends on a lot of variables that can’t always be predicted. For instance, as we noted above, if System Settings is already open, the link may open System Settings but keep you on whatever setting was already in use, instead of taking you to “Screen Recording” or “Accessibility.” Sometimes you may get to the right settings location, but TeamViewer isn’t showing up. Sometimes, it’s just too much!
Don’t get flustered! You can still do this. Below is a guide for how to set these permissions up manually. This shows you how to navigate through System Settings and how to manually add TeamViewer if needed.
Sequel: How to provide necessary System Settings manually for TeamViewer access
You’ve followed steps 1-6 dutifully, but you’ve either run into a wall, or something fritzed out. Fear not!
Keep TeamViewer open during this process, especially if you have an Out of a Jam Tech on the phone with you providing support. Closing TeamViewer will boot them off! But the work we’ll do for this part will be almost entirely in System Settings.
- Open System Settings by clicking the Apple Menu in the top left corner of your screen and choosing “System Settings”
- On the left-hand side, scroll down to “Privacy & Security”
- On the right, scroll down to “Screen & System Audio Recording” (red icon)
- In the top box (“Screen & System Audio Recording” again), you ideally will see TeamViewer and can follow the steps from there. If you don’t see TeamViewer:
- Click the + button in the bottom left corner of the top box. You may have to enter your computer username and password here!
- For TeamViewer and TeamViewer Host, navigate to Applications. You can usually find Applications in the sidebar of the browser window
- In Applications, scroll to find TeamViewer. Click TeamViewer and choose “Open”
- For TeamViewer Quick Support, navigate to “Downloads.” Similar to Applications, Downloads can normally be found in the side bar of the browser window
- In Downloads, use the column headers to sort the items (there are usually a lot). If you click “Name” you can find TeamViewer Quicksupport in the “T’s”. If you click “Date Added” (a column that is usually to the far right), you will see TeamViewer Quicksupport at the date you downloaded it (useful if you just did so!). Once you find TeamViewer Quicksupport, click it and choose “Open”
- If TeamViewer is not showing up in one of these locations, or if you can’t find Applications or Downloads, type “TeamViewer” (no spaces!) into the search bar in the top right corner of the browser window. If this pulls up a TeamViewer application, click it and choose “Open”
- TeamViewer will now show up in the Screen & System Audio Recording top box. Click the toggle to the right of it to enable access. As in the main steps, you may have to authenticate here
- To the left of the header “Screen & System Audio Recording” you should see a back ( < ) button. Click this button. You should now see “Privacy & Security” as the header
- If you don’t see “Privacy & Security” here, use the left-hand side to scroll down to Privacy & Security again
- Scroll through the “Privacy & Security” settings pane til you find and click “Accessibility” (blue icon)
- Accessibility only has one box. If TeamViewer is not shown here, click the + button in the bottom left corner of the small Accessibility box. Follow manual addition steps 6-11 to add and enable TeamViewer
- Close System Settings.
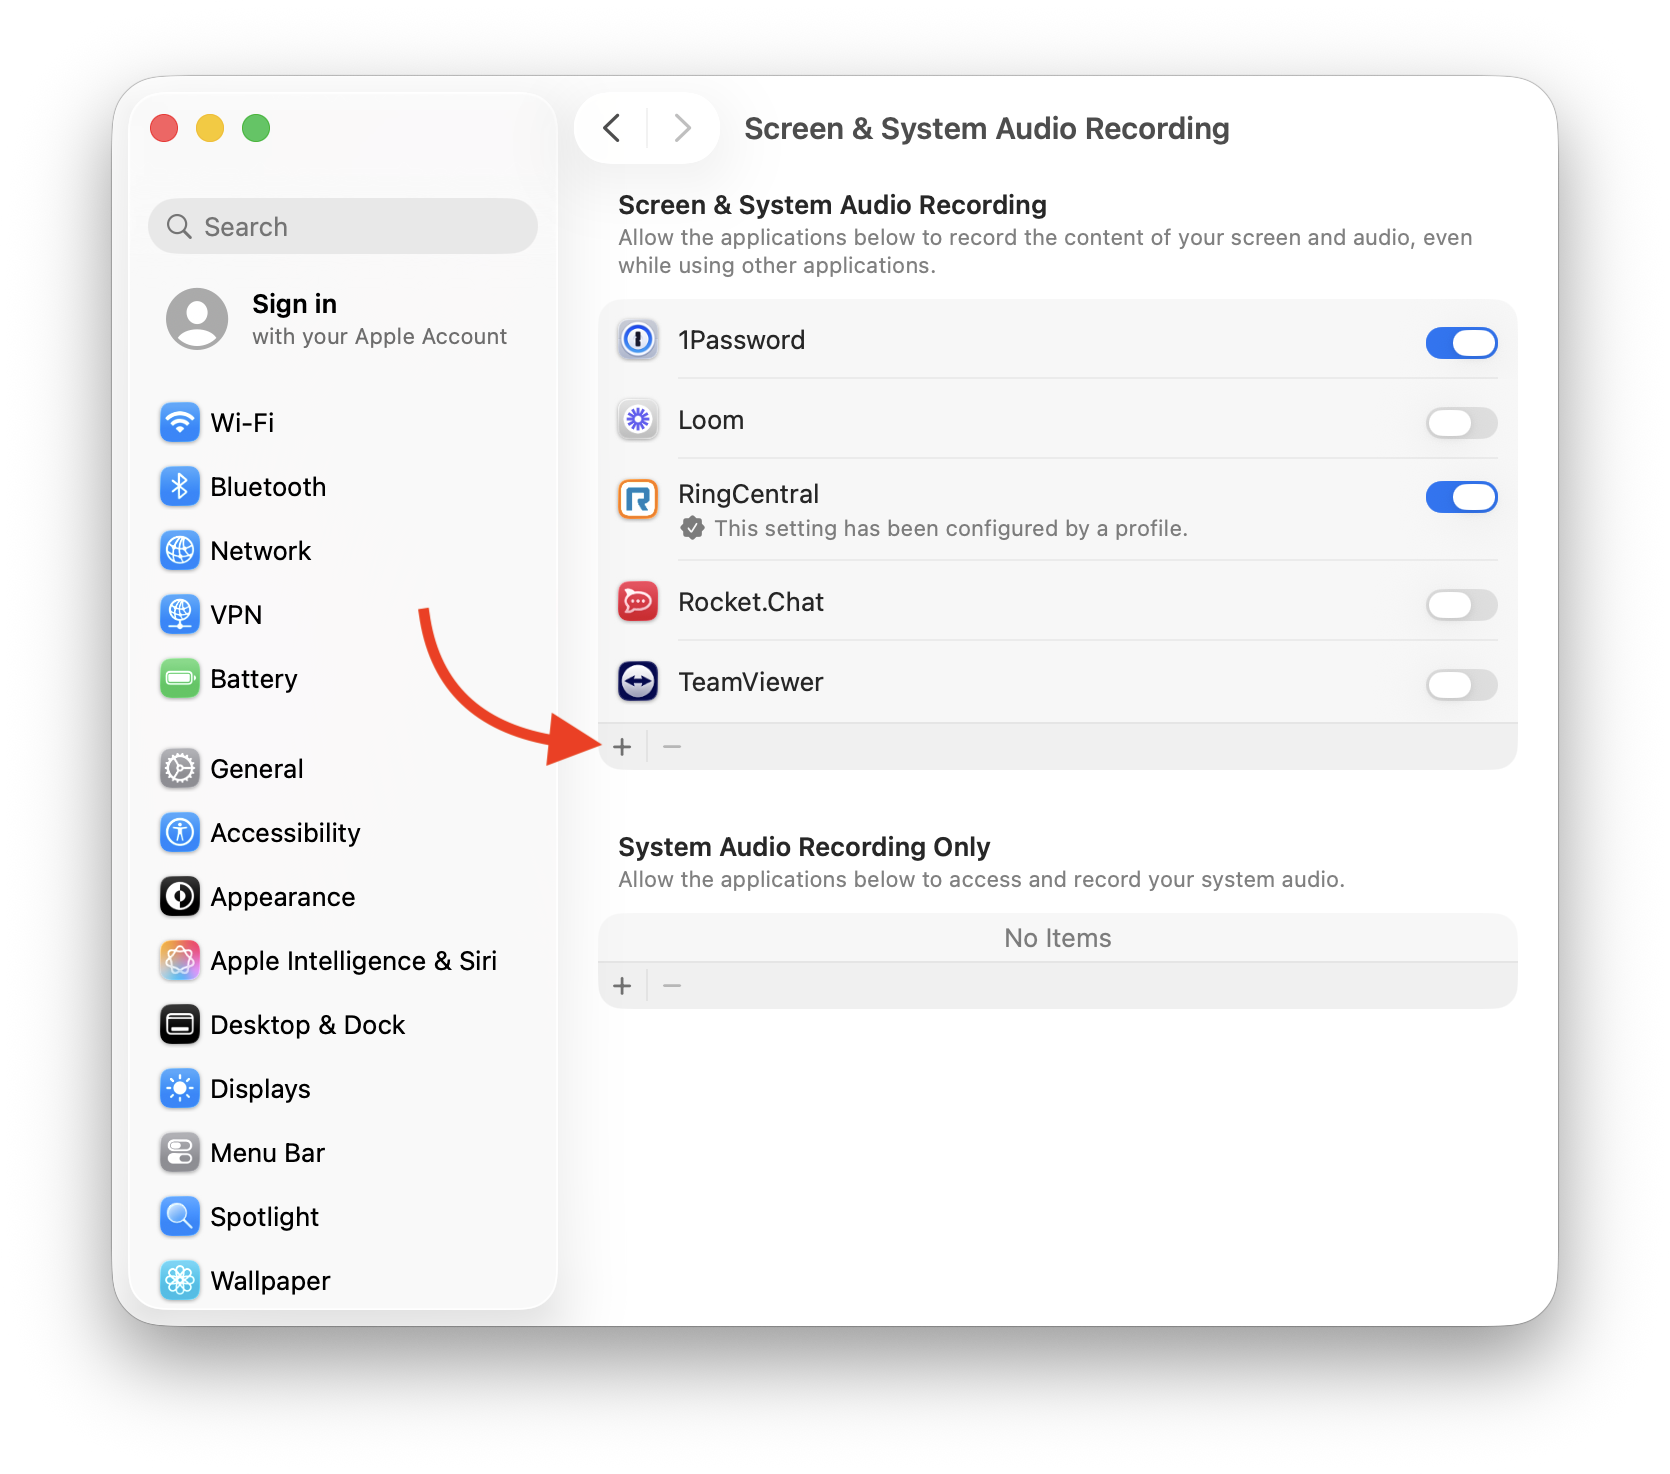
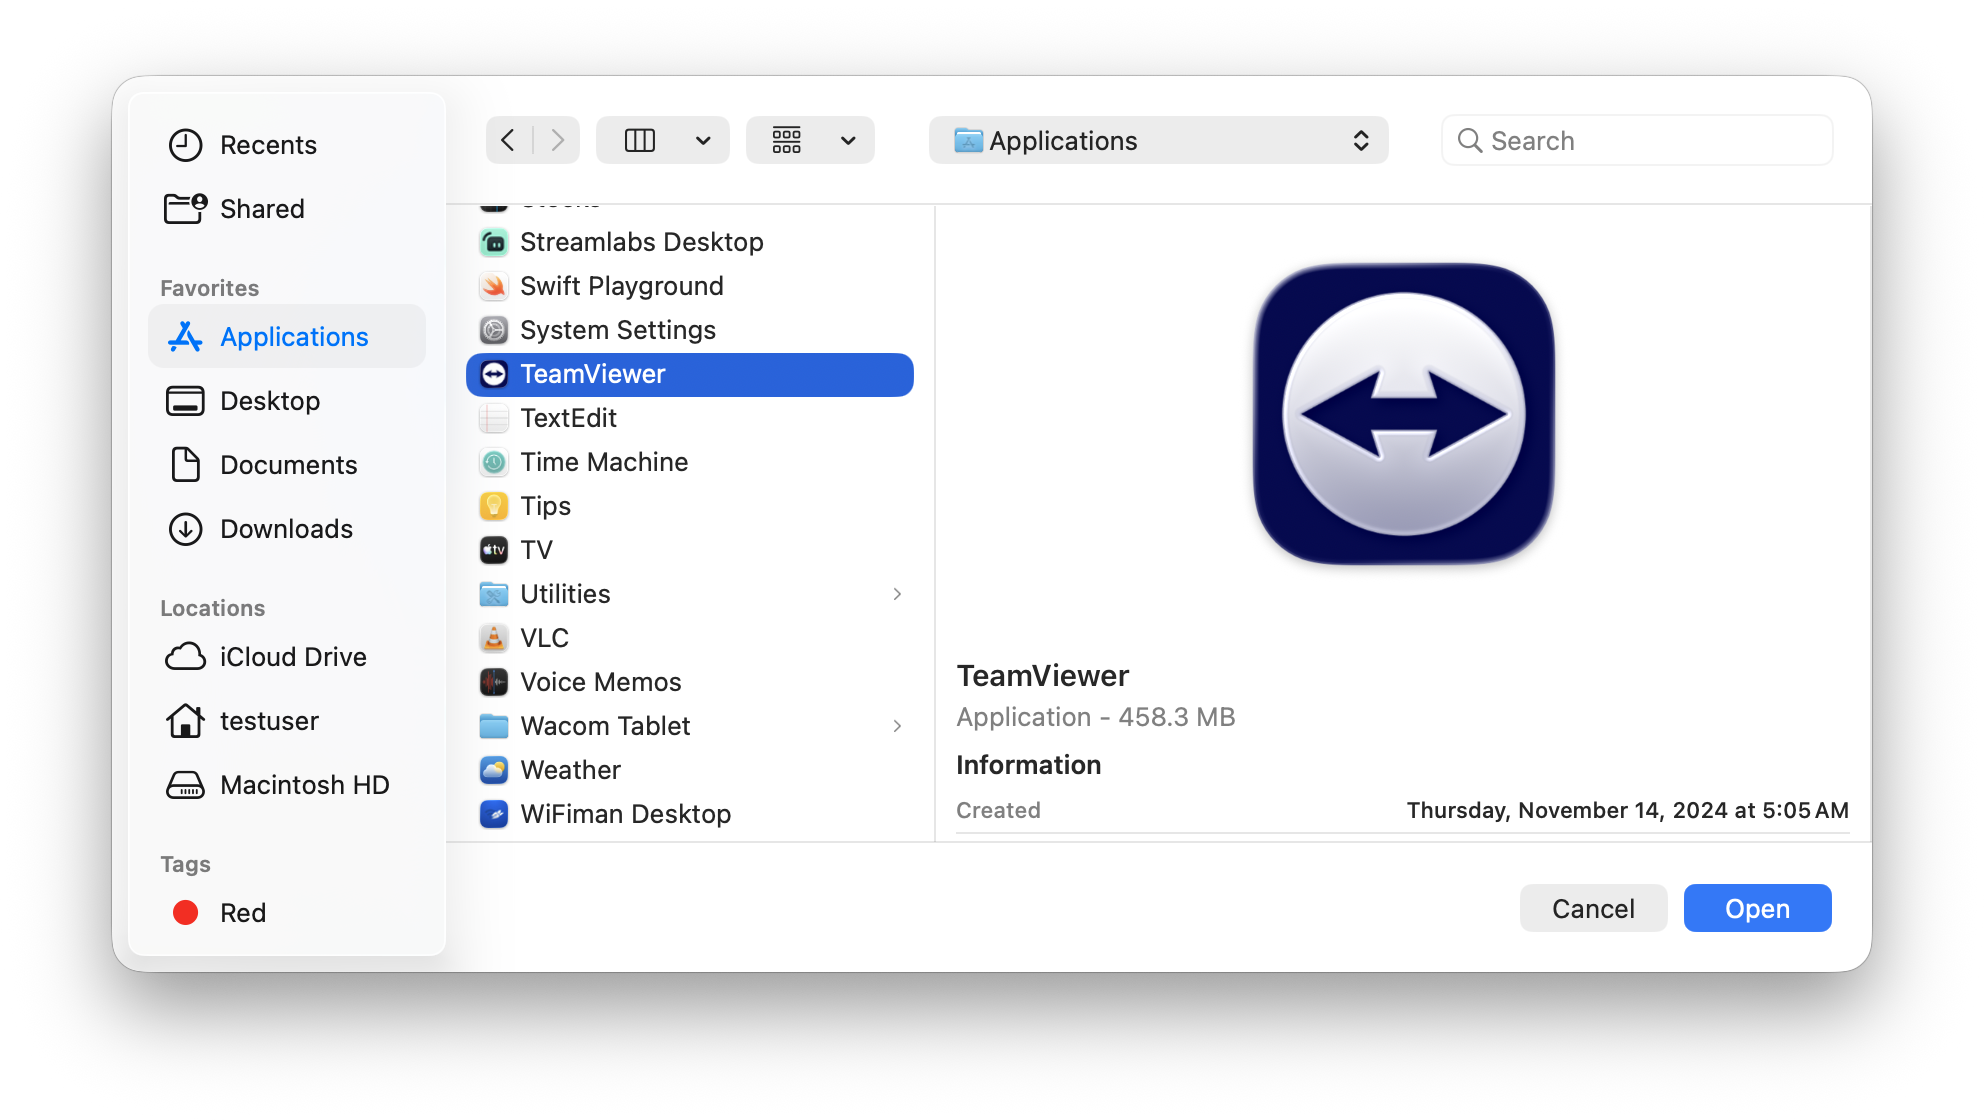
Check to see if TeamViewer is reflecting the updated access with blue checks or green dots. When you manually add these permissions, TeamViewer sometimes doesn’t register the change. Quit out of TeamViewer completely by clicking “TeamViewer” in the top left corner next to the Apple icon and choosing “Quit TeamViewer,” or by right-clicking the TeamViewer icon in your Dock and choosing “Quit,” or by clicking the TeamViewer icon in the top right of your computer screen (in the menu bar near the wifi symbol) and choosing to “Quit” or “Exit.” Open TeamViewer again and check system access. It still may not reflect the change, but have your tech try to connect, and they will be able to tell you if the access is working or not. As usual, sometimes a computer restart does the trick!
If TeamViewer isn’t already open, you can open it now! Start by clicking the magnifying glass in the top right corner of your screen. A little search field should pop up that says “Spotlight Search.” Here you can type the word “team.” No spaces before or after, and no need to capitalize… Just type the word “team” !
If TeamViewer is already installed on your computer, you should see one of the versions pop up as the first result under “Apps.” You can hit return or click “TeamViewer ___” to open it!
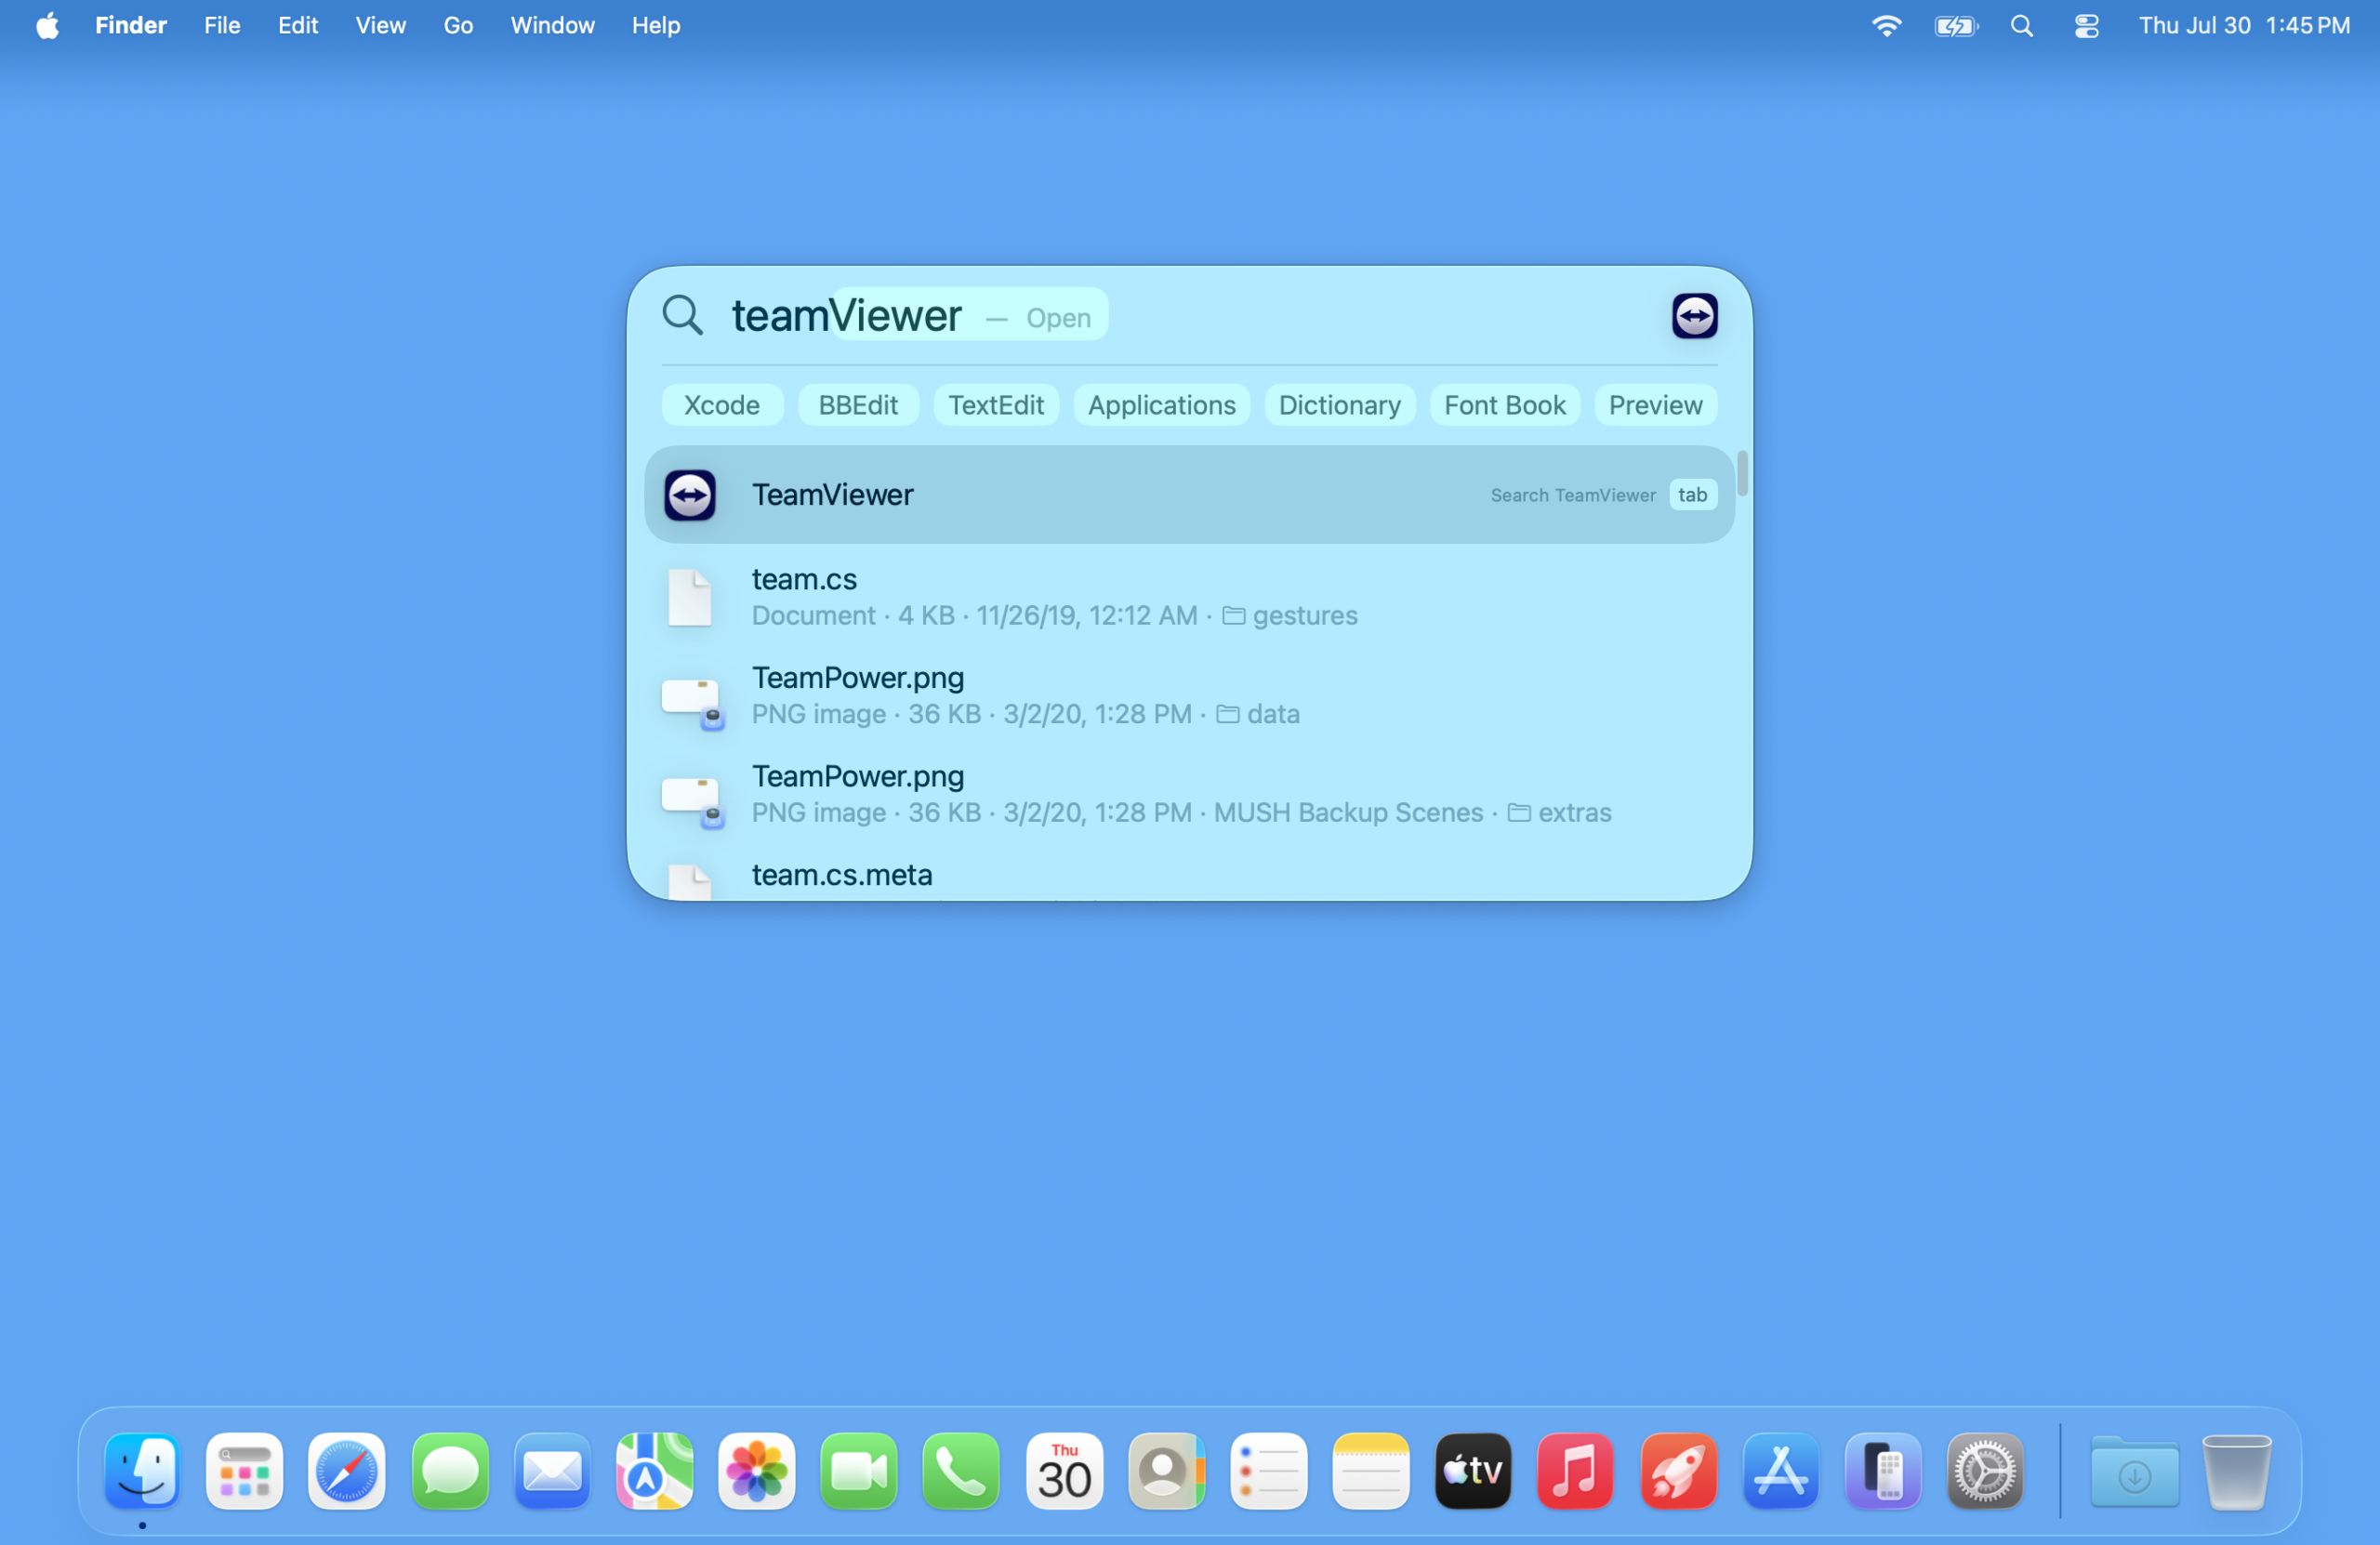
You will know TeamViewer is open in two ways:
- In your Dock, you should see a blue icon with a white circle and two arrows. Under that icon you should see a small dot that indicates TeamViewer is running. If you don’t see the icon, start at the beginning of “How to Open TeamViewer” again! If you see the icon, but there’s no dot, click the icon– This should open the app.
- When you click the icon, you should now see in the top left corner of your screen, to the right of the Apple icon, “TeamViewer” (+ the version if you have TeamViewer Host or TeamViewer Quicksupport).


Is TeamViewer even on here???
If TeamViewer is not already installed on your computer, the first result will likely be something else that is on your computer, like Microsoft Teams, an email you sent to the softball team, or something else. It might also show you the result for TeamViewer’s website, where you can download it– But first, make sure you need it! Here’s a workflow to see what you should do.
Are you an Out of a Jam client preparing for a remote support session?
Your tech will send you a dedicated link to safely download the app. You can sit tight until then!
This is software that is used by support companies like Out of a Jam to help facilitate remote access– In other words, to be able to see and even control your computer from anywhere via the internet. If you aren’t actively looking for support, or in need of TeamViewer for some other reason (some people use it to remote into their own computers from a different location, for example!), there’s no need to download or install it. Less is more!
PSS: Apply this elsewhere
Any application that needs access to your camera, to other apps, to screen recording, to audio recording, to your microphone, and hundreds of other settings on macOS will have to request that permission and be granted it in a similar way to TeamViewer. This guide can apply to any number of apps that request permission this way!